· Caliber Dynamics · Guides · 6 min read
CDYN GameGlass Shards: Complete Control Panel Guide
A detailed breakdown of every Caliber Dynamics custom GameGlass shard for Star Citizen — what each button does and when to use it.
Caliber Dynamics maintains a full suite of custom GameGlass shards built for Star Citizen. Each shard is designed around a specific gameplay role so you always have the right controls at your fingertips. This guide breaks down every panel so you know exactly what each button does.
If you have not installed our shards yet, follow our download and setup guide first.
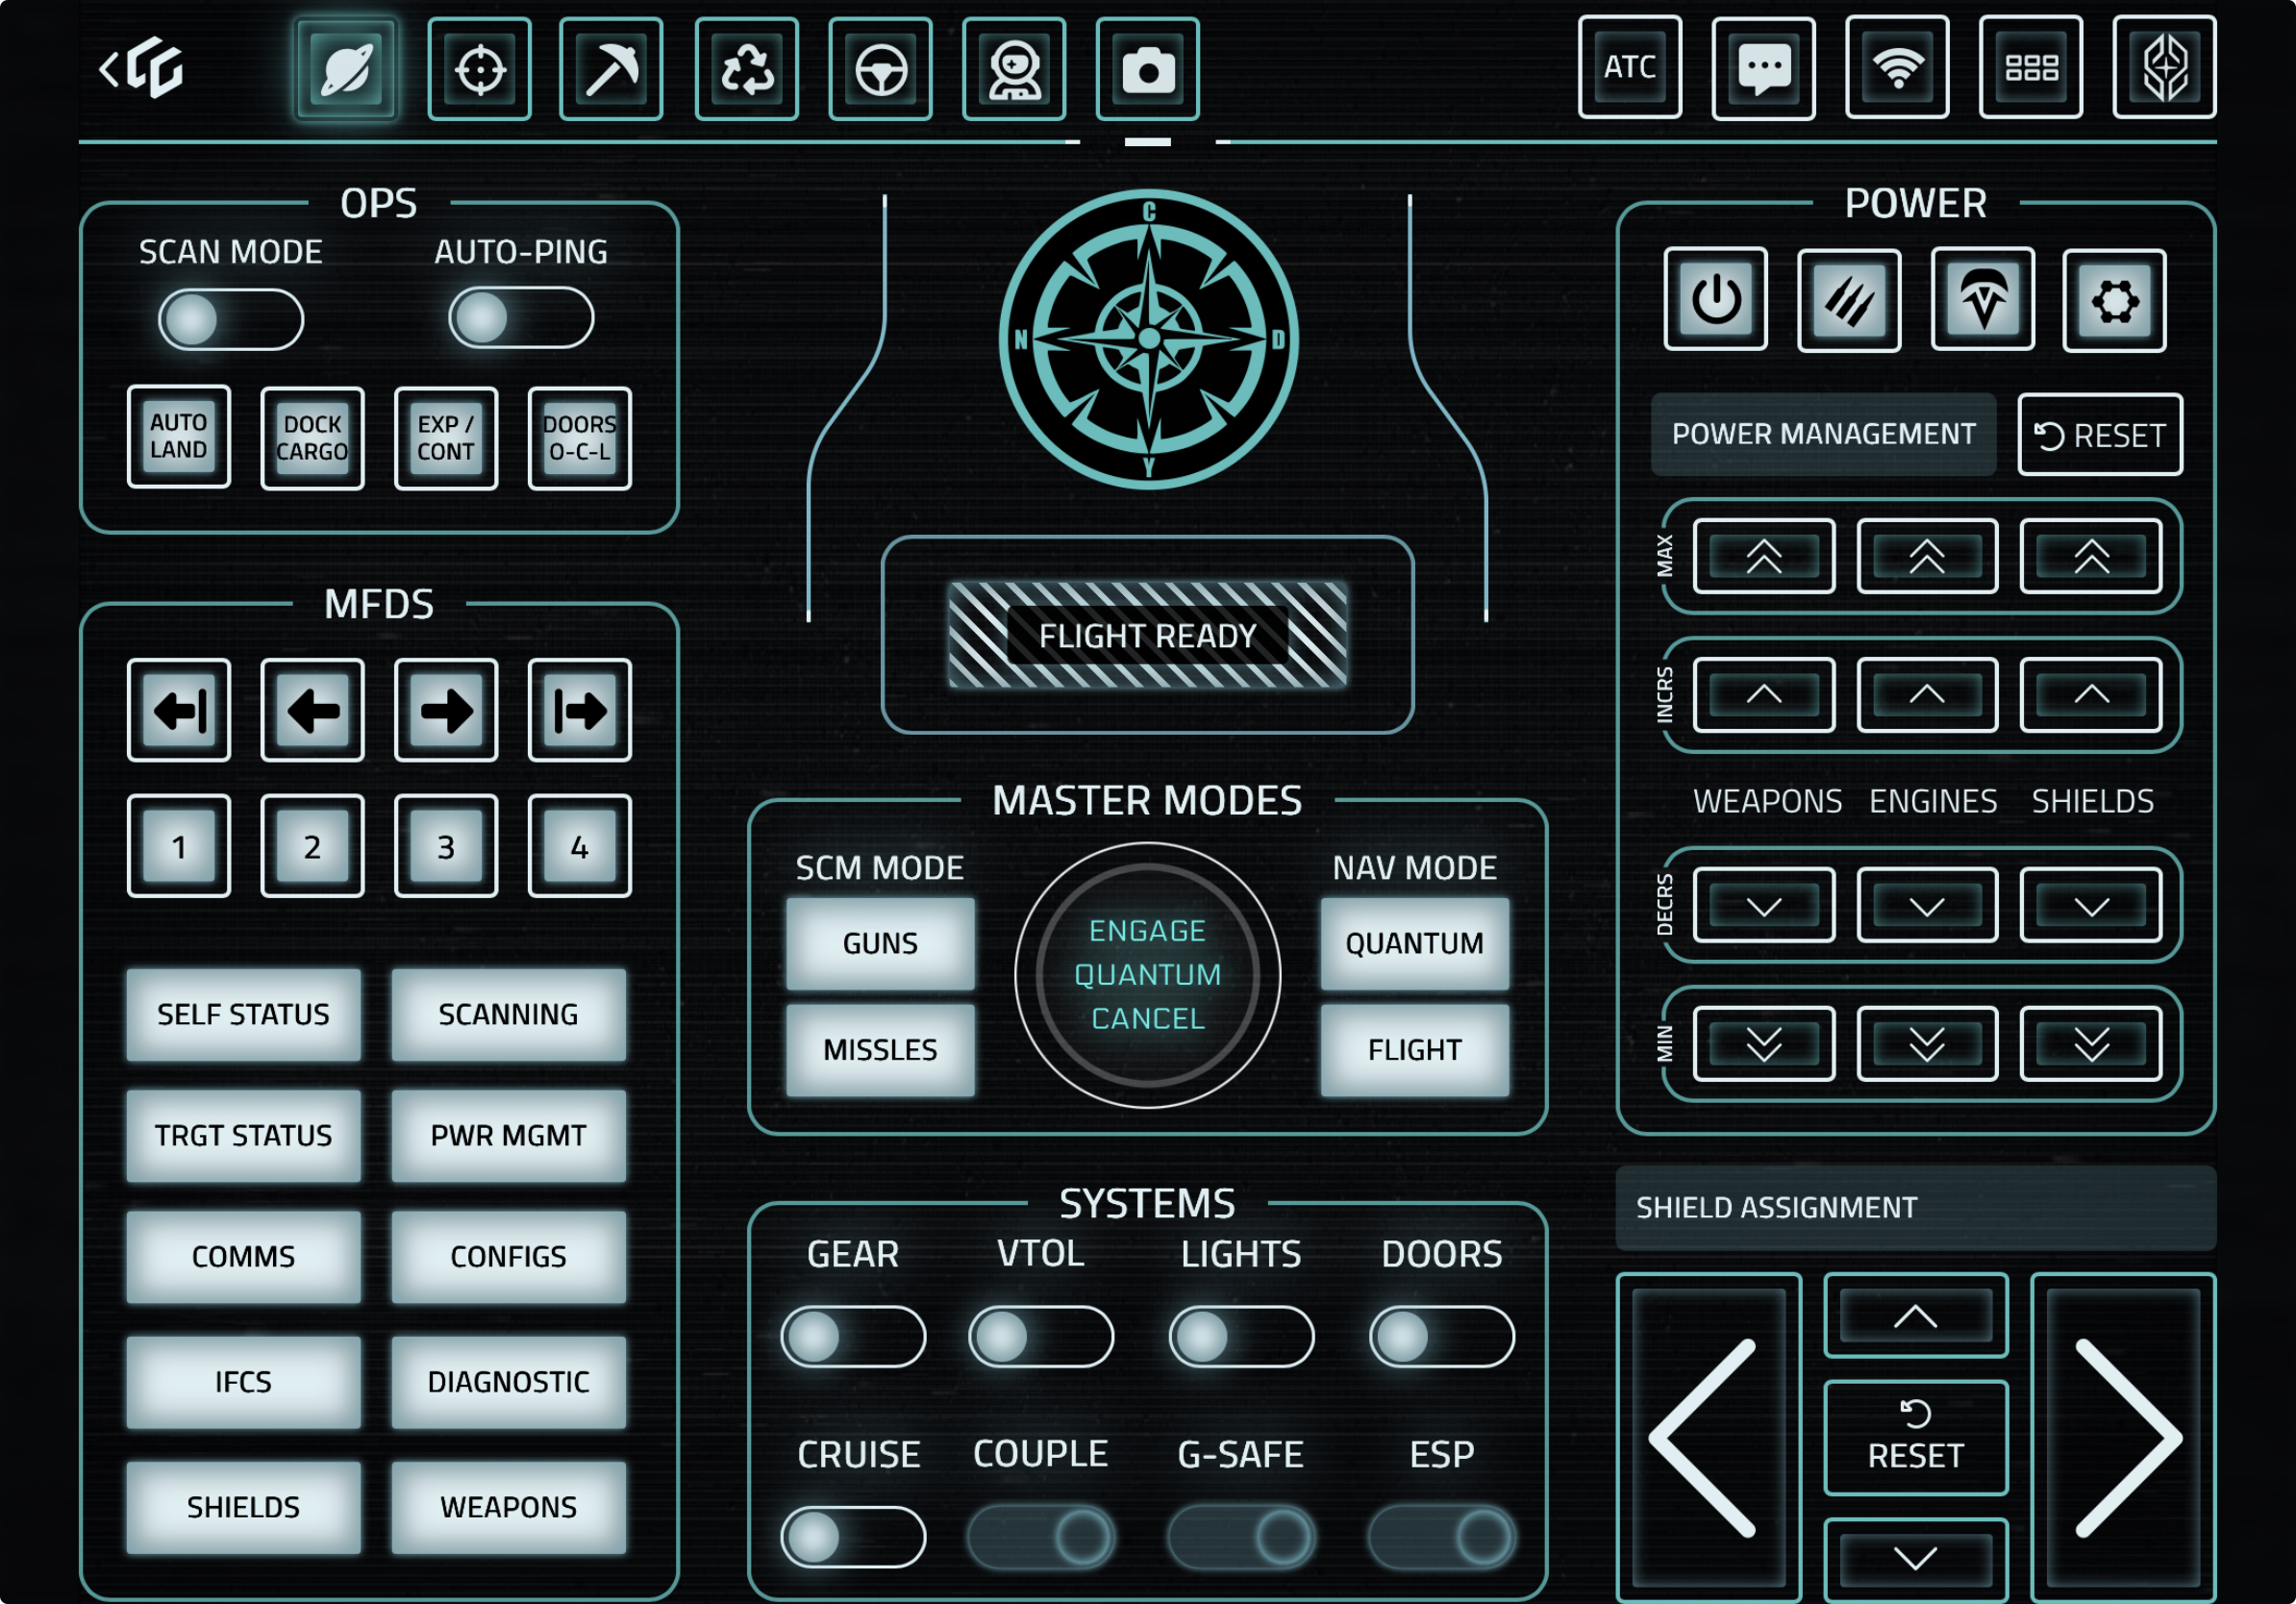
Main Shard
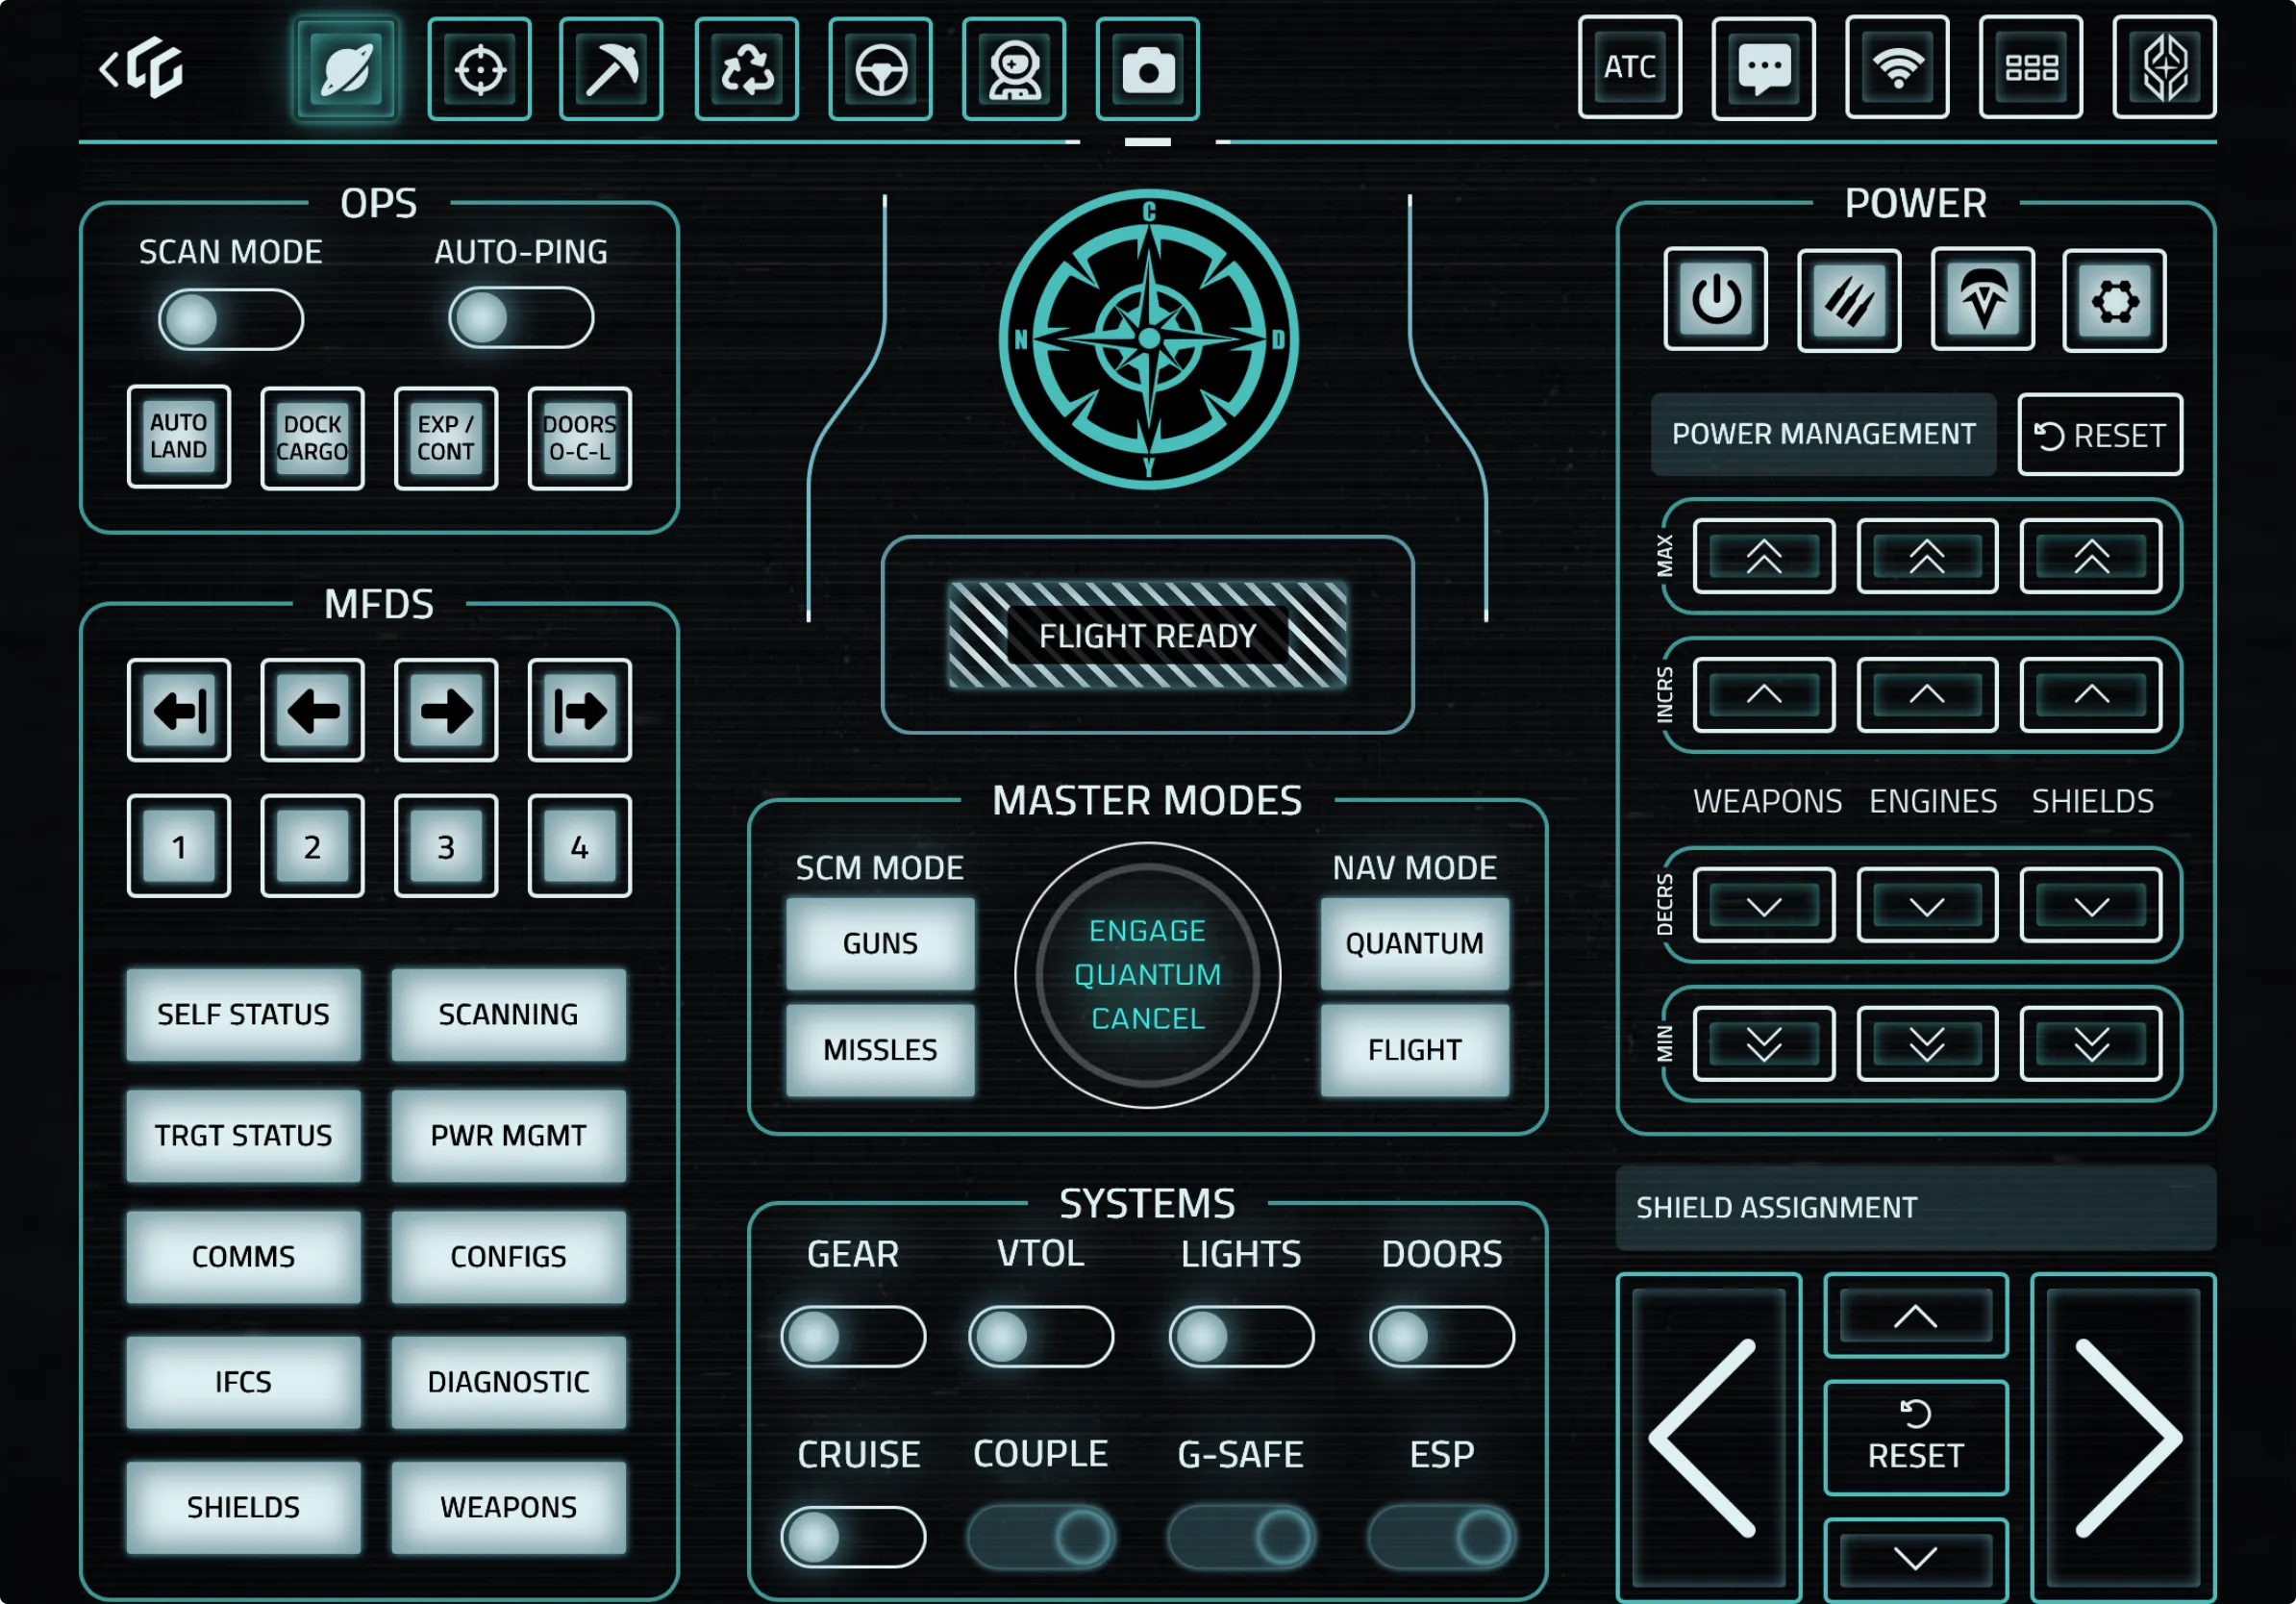
The Main shard is your default flight control panel and the one you will use most often. It covers everything you need for standard flight operations.
OPS Section (Top Left)
- Scan Mode — Toggle scanning mode on and off
- Auto-Ping — Enable automatic ping for passive scanning
- Auto Land — Initiate automated landing sequence
- Dock Cargo — Open the cargo docking interface
- Exp/Cont — Expand or contract landing gear configuration
- Door D-CH — Toggle door and cargo hatch controls
MFDs (Multi-Function Displays)
The arrow buttons let you cycle through MFD screens, and buttons 1–4 jump directly to specific MFD pages. Below that you have quick access to:
- Self Status / Scanning — Ship status and scanner displays
- Trgt Status / Pwr Mgmt — Target info and power management
- Comms / Configs — Communications and ship configuration
- IFCS / Diagnostic — Flight computer and diagnostic readouts
- Shields / Weapons — Shield and weapons displays
Master Modes (Center)
- SCM Mode — Switch to Space Combat Maneuvering mode
- Guns — Enable ballistic/energy weapons
- Missiles — Switch to missile mode
- Nav Mode — Switch to Navigation mode
- Quantum — Engage quantum travel mode
- Flight — Standard flight controls
- Engage Quantum Cancel — The large center dial engages or cancels quantum jumps
Systems (Bottom Center)
- Gear — Toggle landing gear
- VTOL — Toggle VTOL thrusters
- Lights — Ship lights on/off
- Doors — Open/close doors
- Cruise — Cruise control toggle
- Couple — Toggle coupled/decoupled flight
- G-Safe — G-force safety limiter
- ESP — Enhanced Stick Precision (aim assist for joystick users)
Power (Right Side)
The power triangle lets you distribute power between Weapons, Engines, and Shields using the up/down arrows. The Power Management button opens the full power interface, and Reset returns power to default distribution.
Shield Assignment (Bottom Right)
Directional arrows shift shield power to specific faces of your ship. The Reset button rebalances shields evenly.
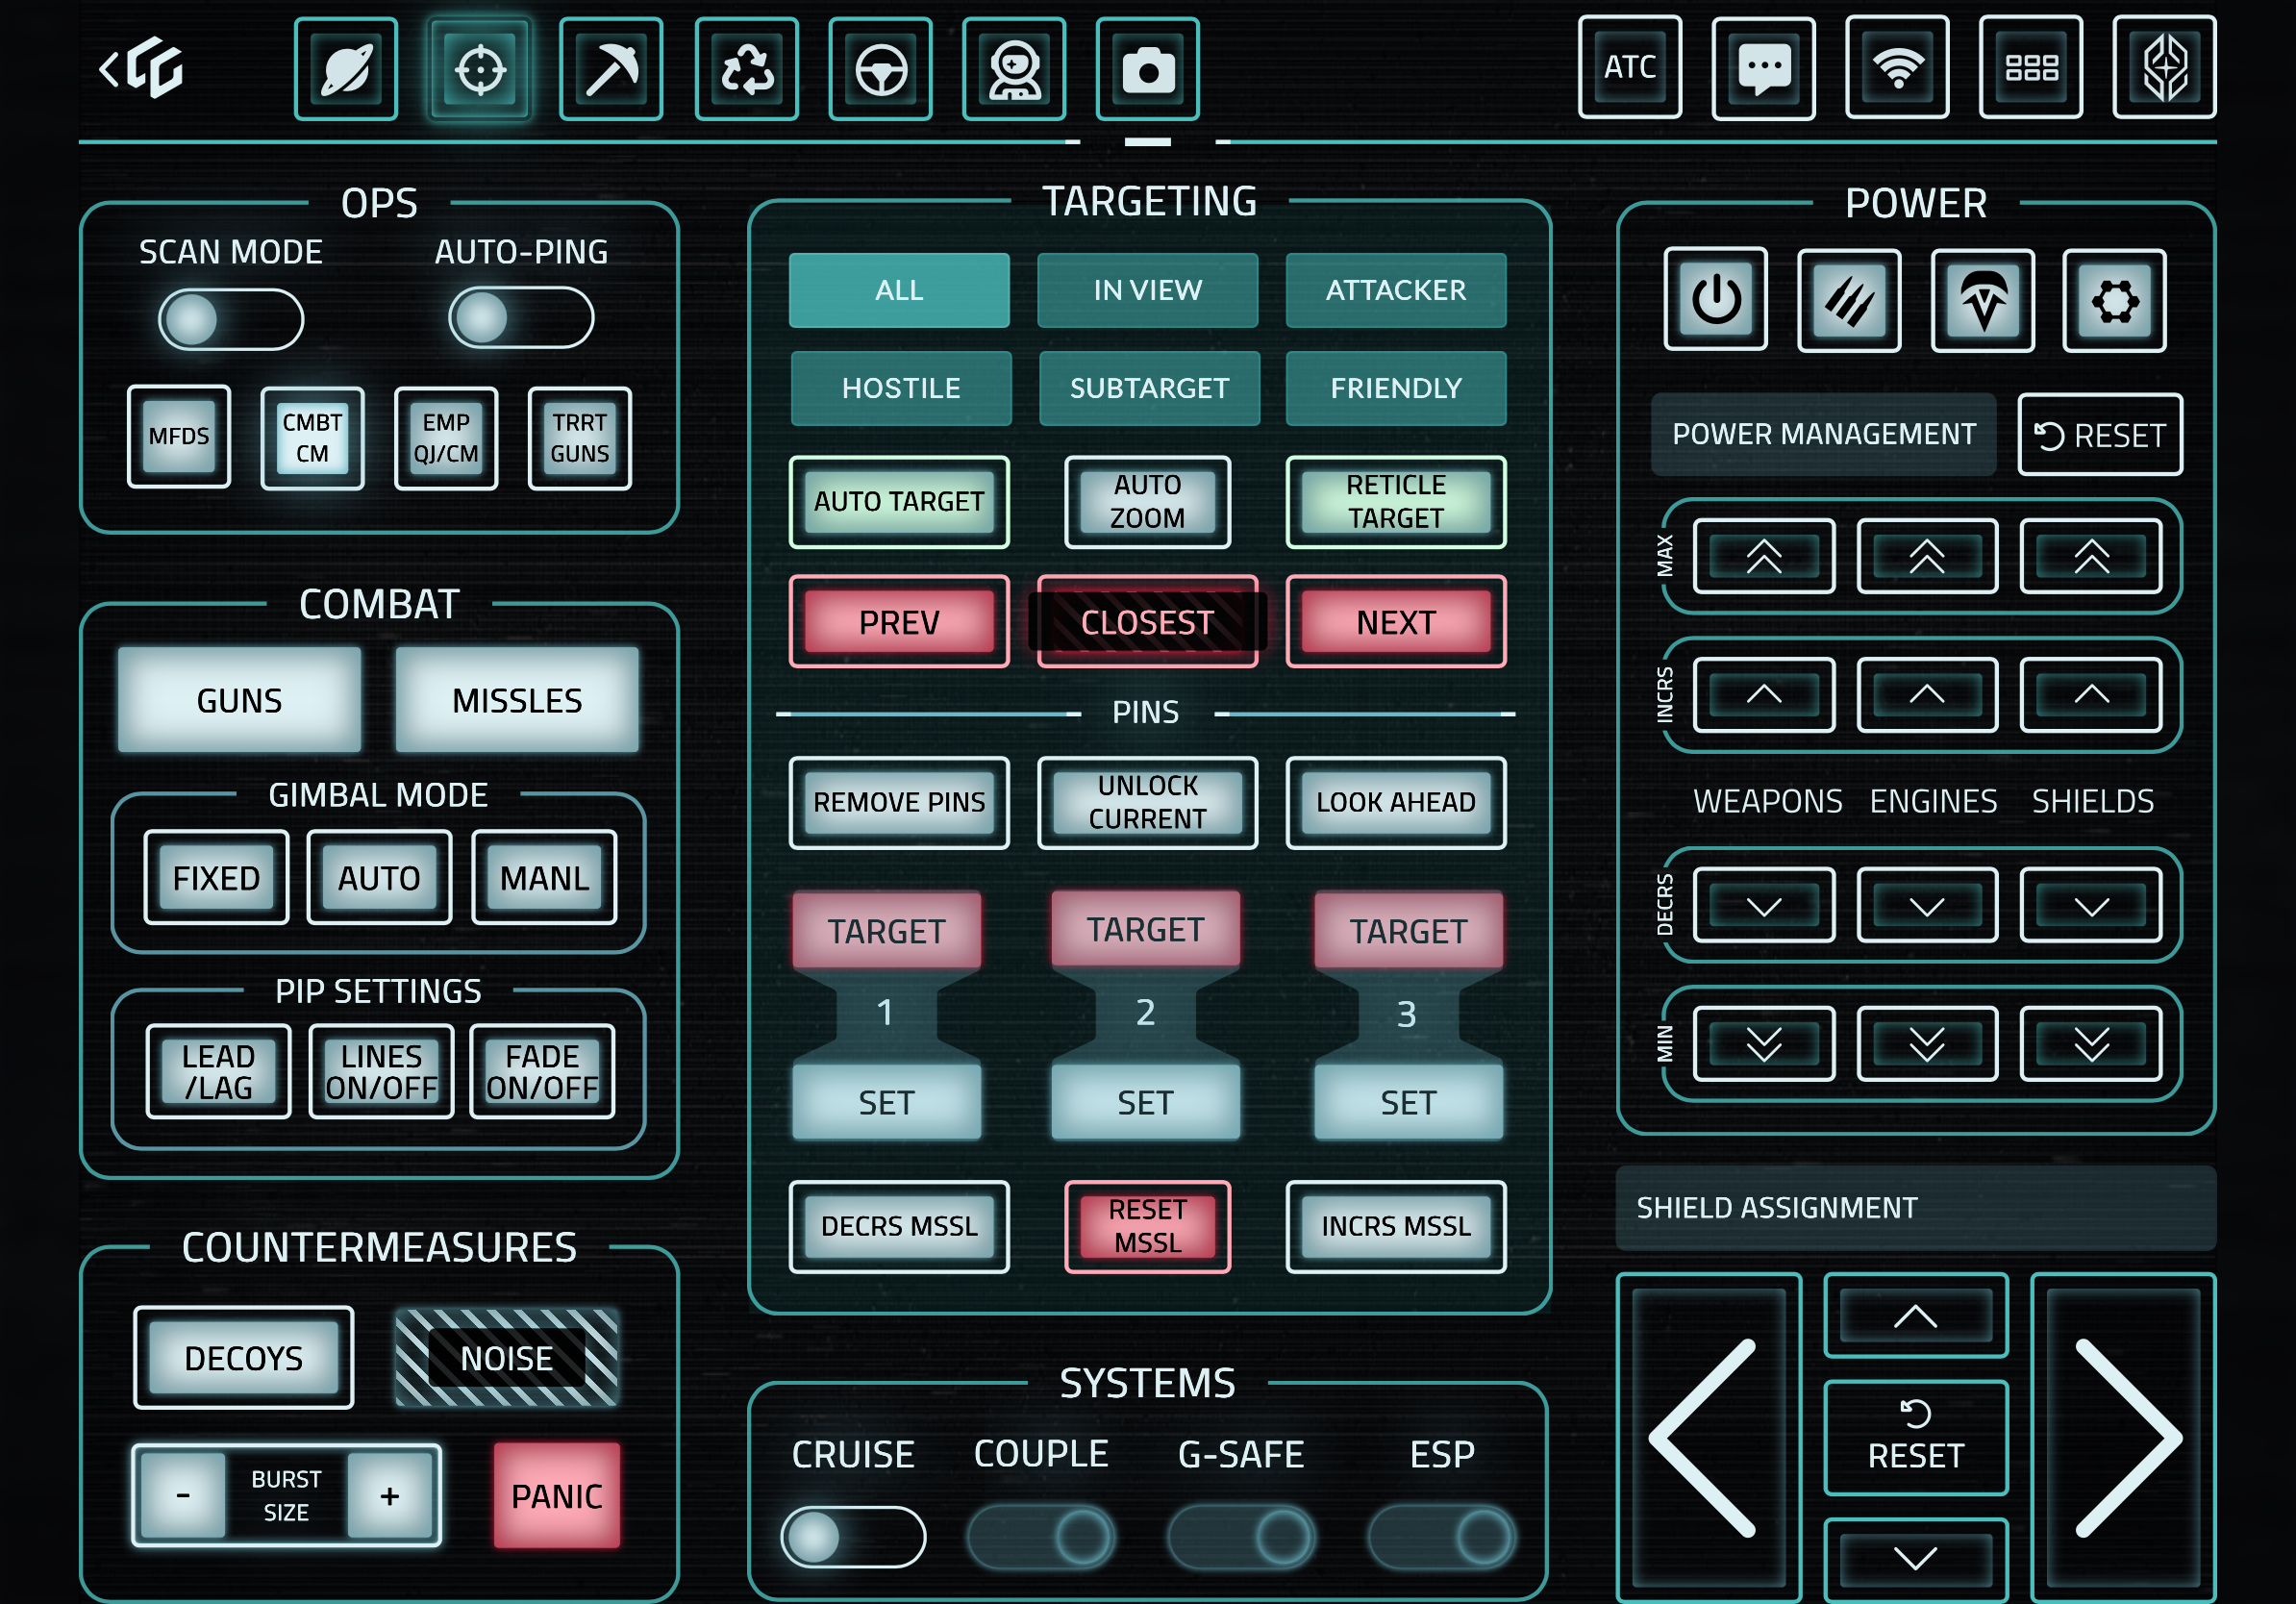
Combat Shard
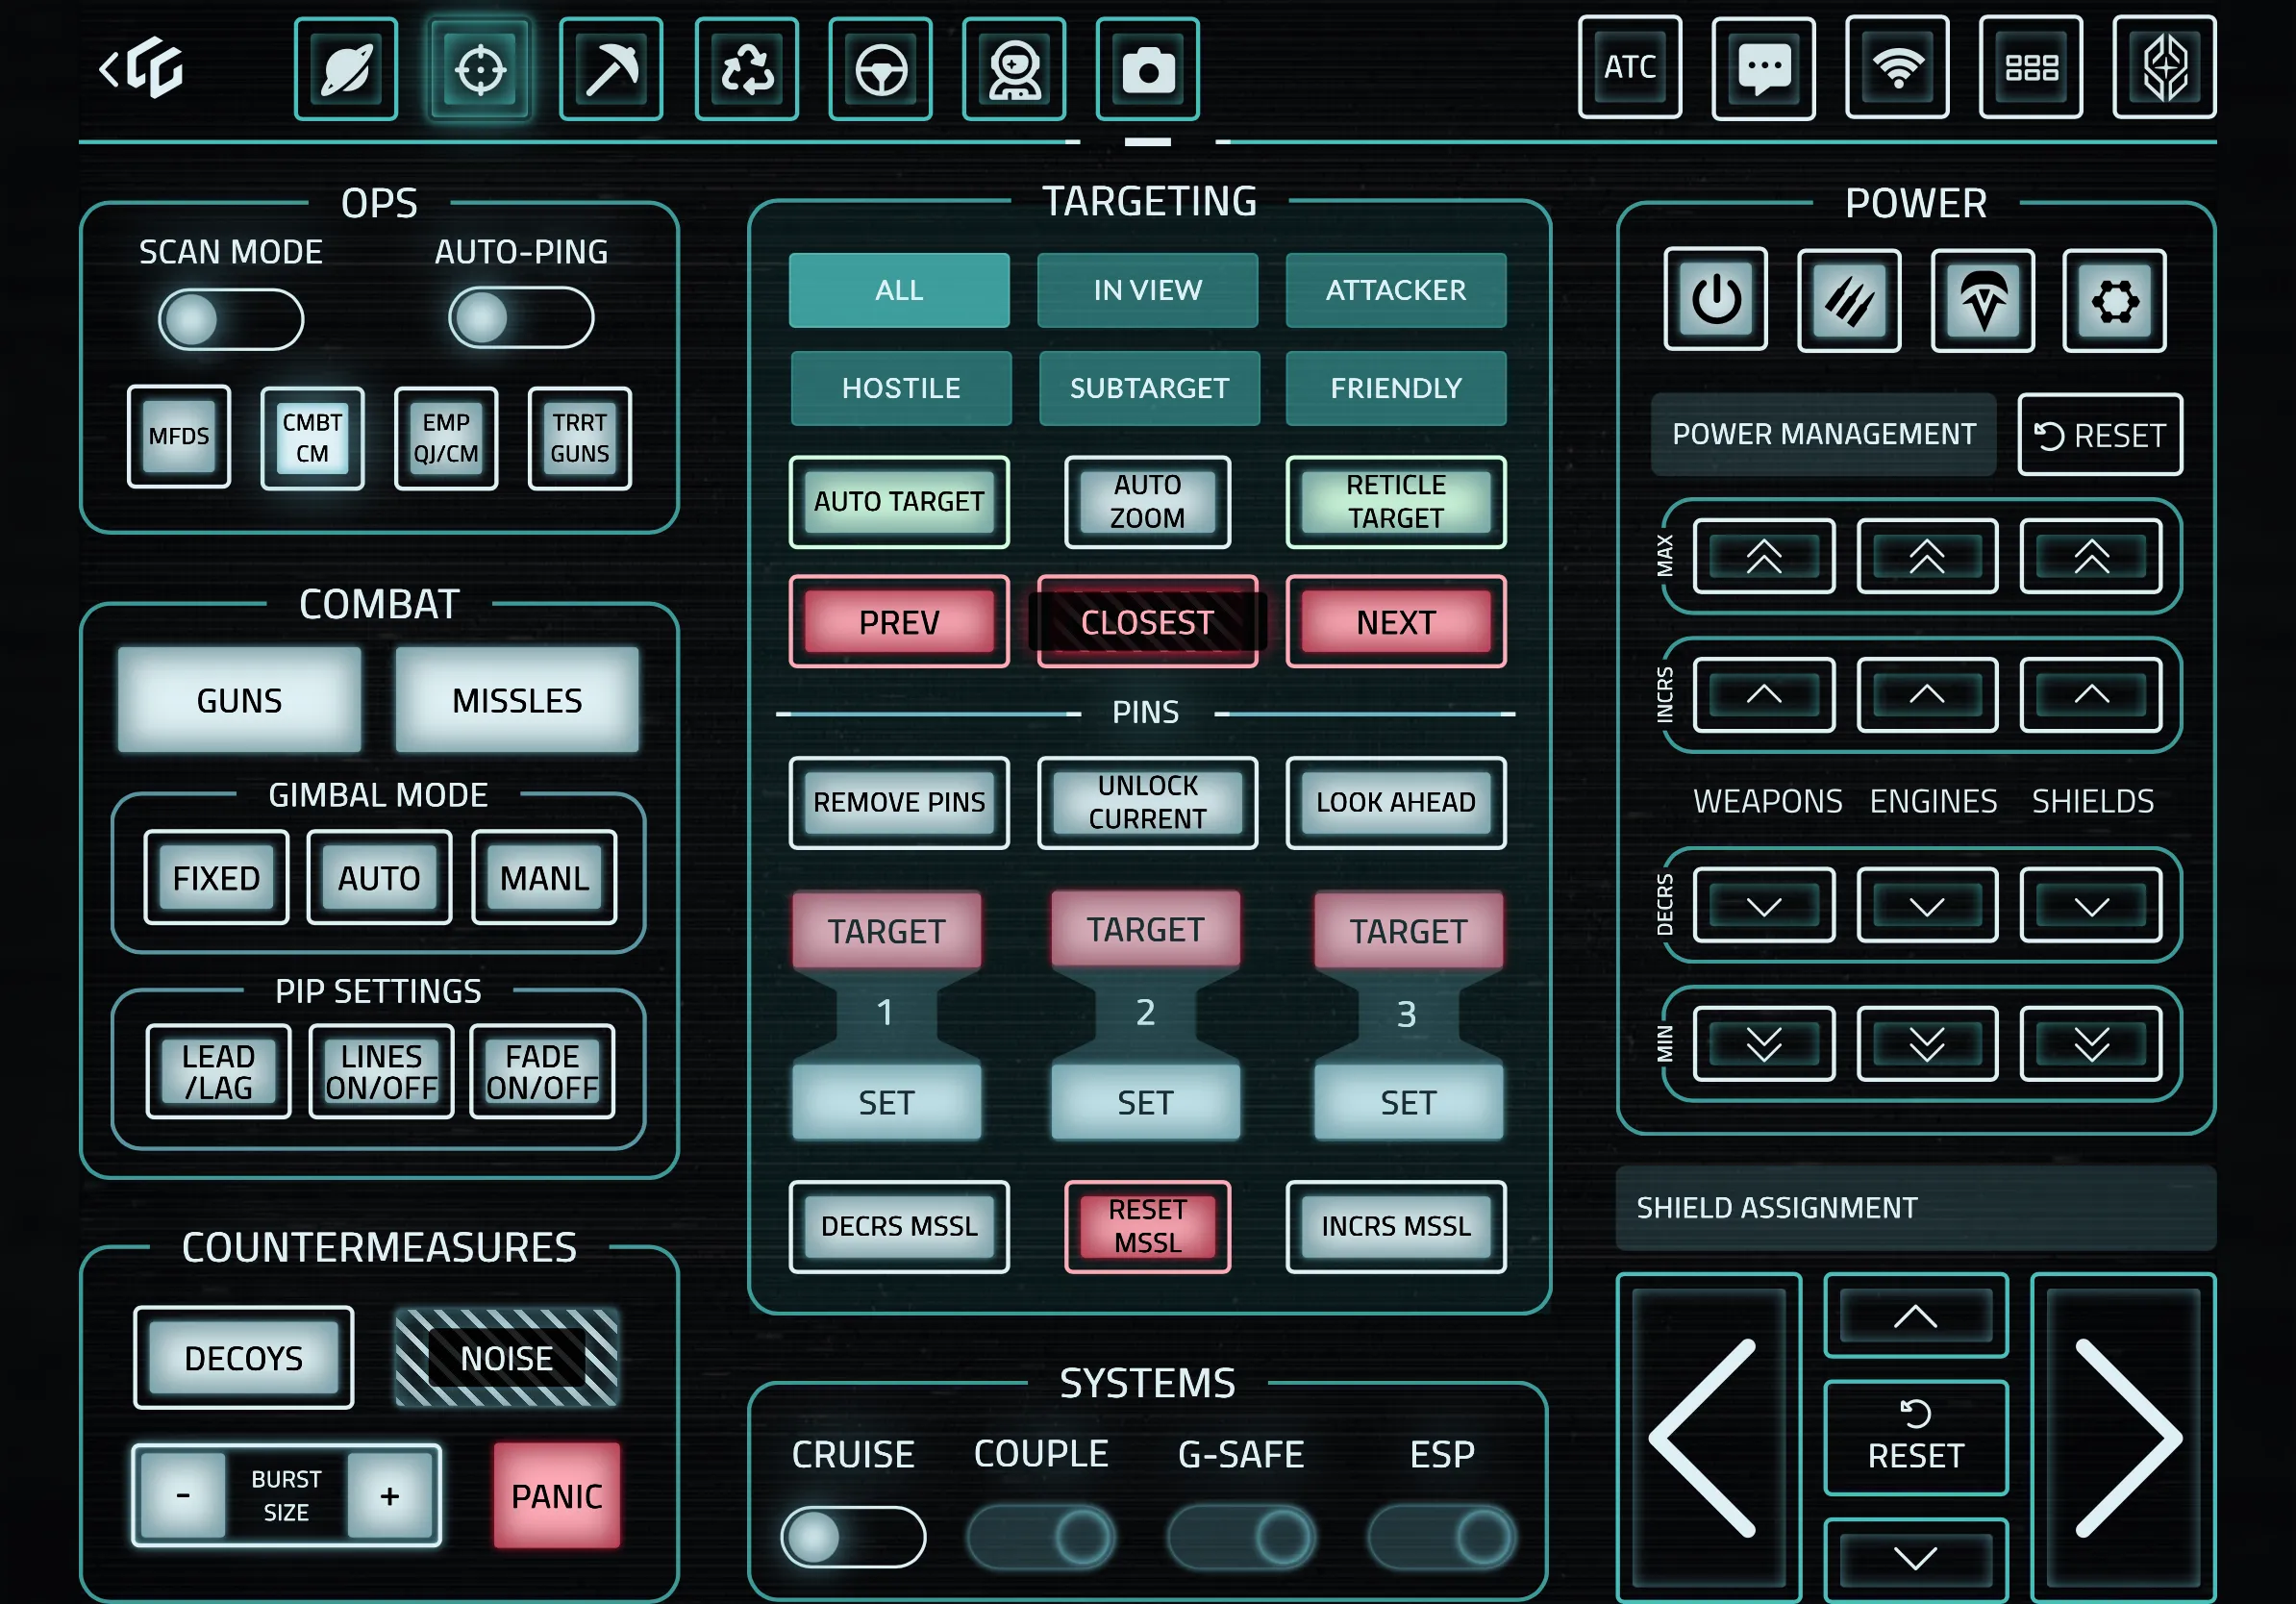
The Combat shard replaces the center section of the Main shard with targeting, weapon management, and countermeasure controls.
Targeting
- All / In View / Attacker — Filter targets by category
- Hostile / Subtarget / Friendly — Further target filtering
- Auto Target — Automatically lock the nearest threat
- Auto Zoom — Toggle automatic zoom on targets
- Reticle Target — Lock whatever is under your crosshair
- Prev / Closest / Next — Cycle through available targets
Pins
Pin up to three targets for quick switching during combat:
- Target 1–3 — Switch to a pinned target
- Set — Pin the current target to that slot
- Remove Pins — Clear all pinned targets
- Unlock Current — Release the current target lock
- Look Ahead — Snap view forward
Gimbal Mode
- Fixed — Weapons fire straight ahead
- Auto — Gimbals track automatically
- Manual — Manual gimbal aim control
PIP Settings
- Lead/Lag — Toggle lead or lag pip indicators
- Lines On/Off — Toggle targeting lines
- Fade On/Off — Toggle pip fade effect
Countermeasures
- Decoys — Deploy decoy countermeasures
- Noise — Deploy noise countermeasures
- Burst Size — Adjust how many countermeasures deploy per burst
- Panic — Deploy all countermeasures at once (emergency use)
Missile Management
- Decrs Mssl / Incrs Mssl — Cycle through missile types
- Reset Mssl — Reset missile selection to default
Mining Shard
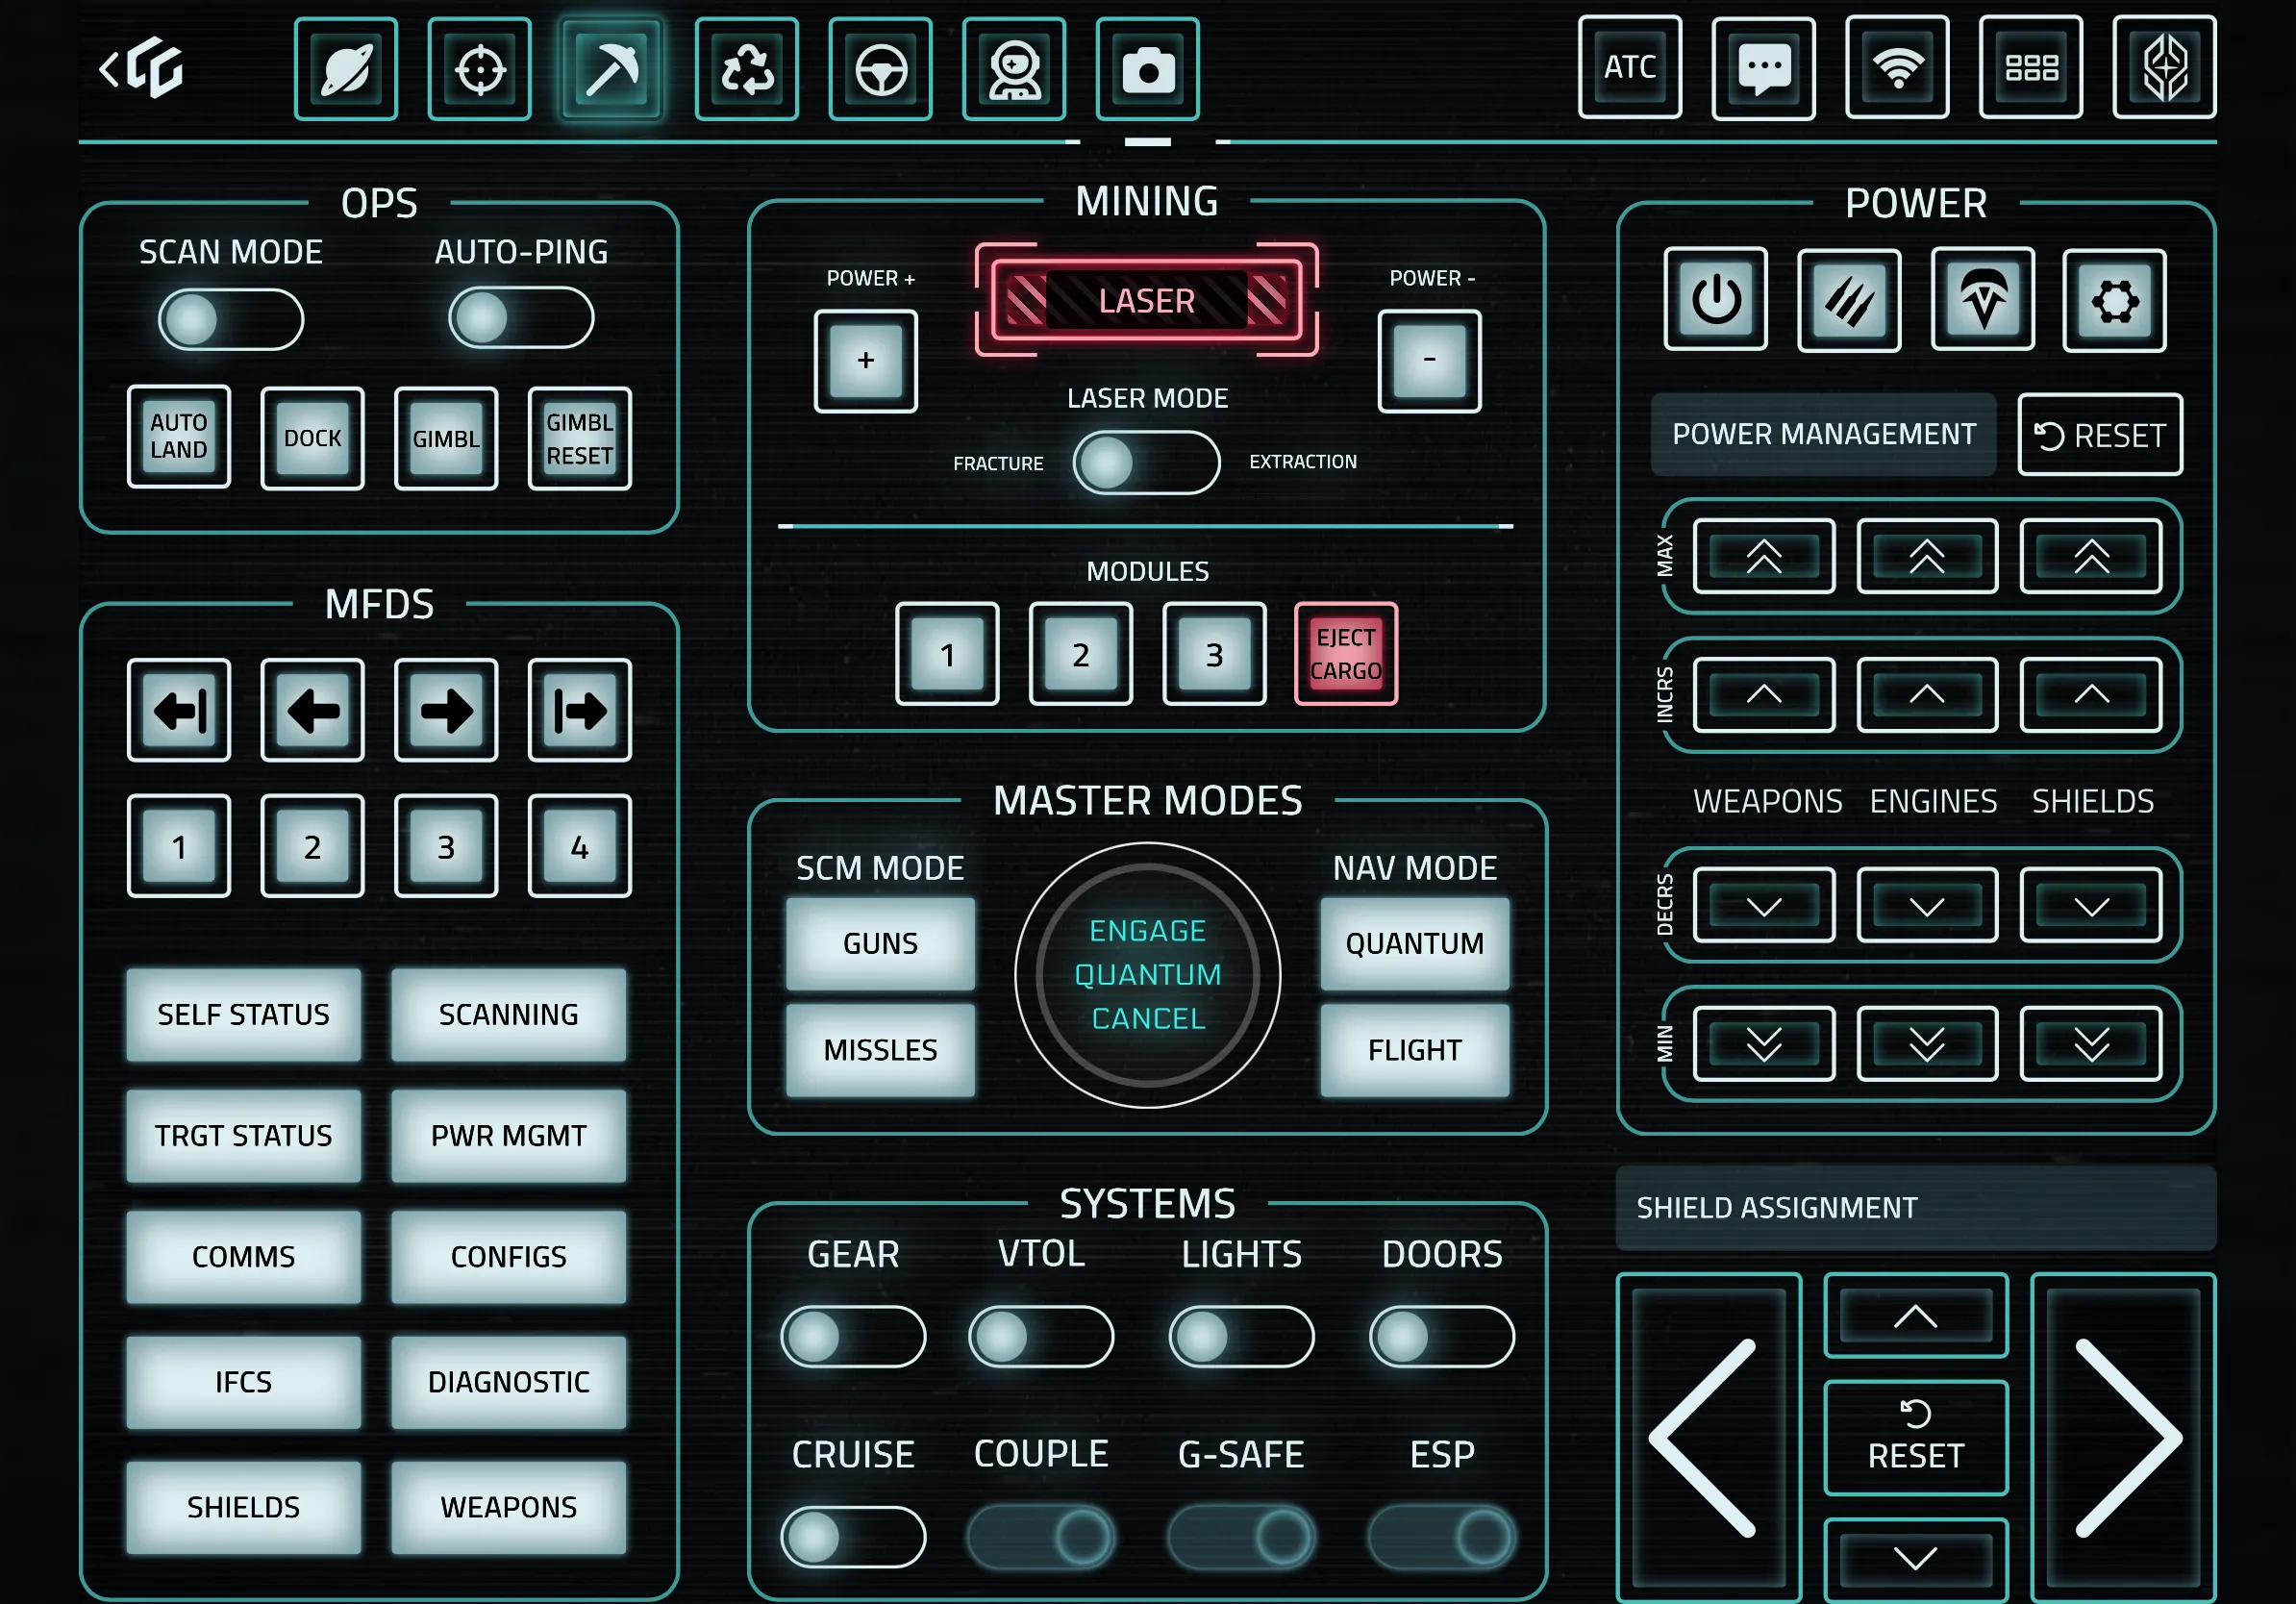
The Mining shard adds dedicated mining laser controls while keeping flight essentials accessible.
Mining Controls (Center Top)
- Laser — Toggle the mining laser on and off
- Power + / Power – — Adjust mining laser power output
- Laser Mode — Switch between Fracture (breaking rocks) and Extraction (collecting materials)
- Modules 1–3 — Activate mining gadget modules (Surge, Stampede, etc.)
- Jett Cargo — Emergency jettison of cargo (use with caution)
The rest of the shard retains the Main shard’s flight controls, MFDs, Master Modes, Systems, Power, and Shield Assignment — everything you need to fly to a mining site and operate without switching panels.
Salvage Shard
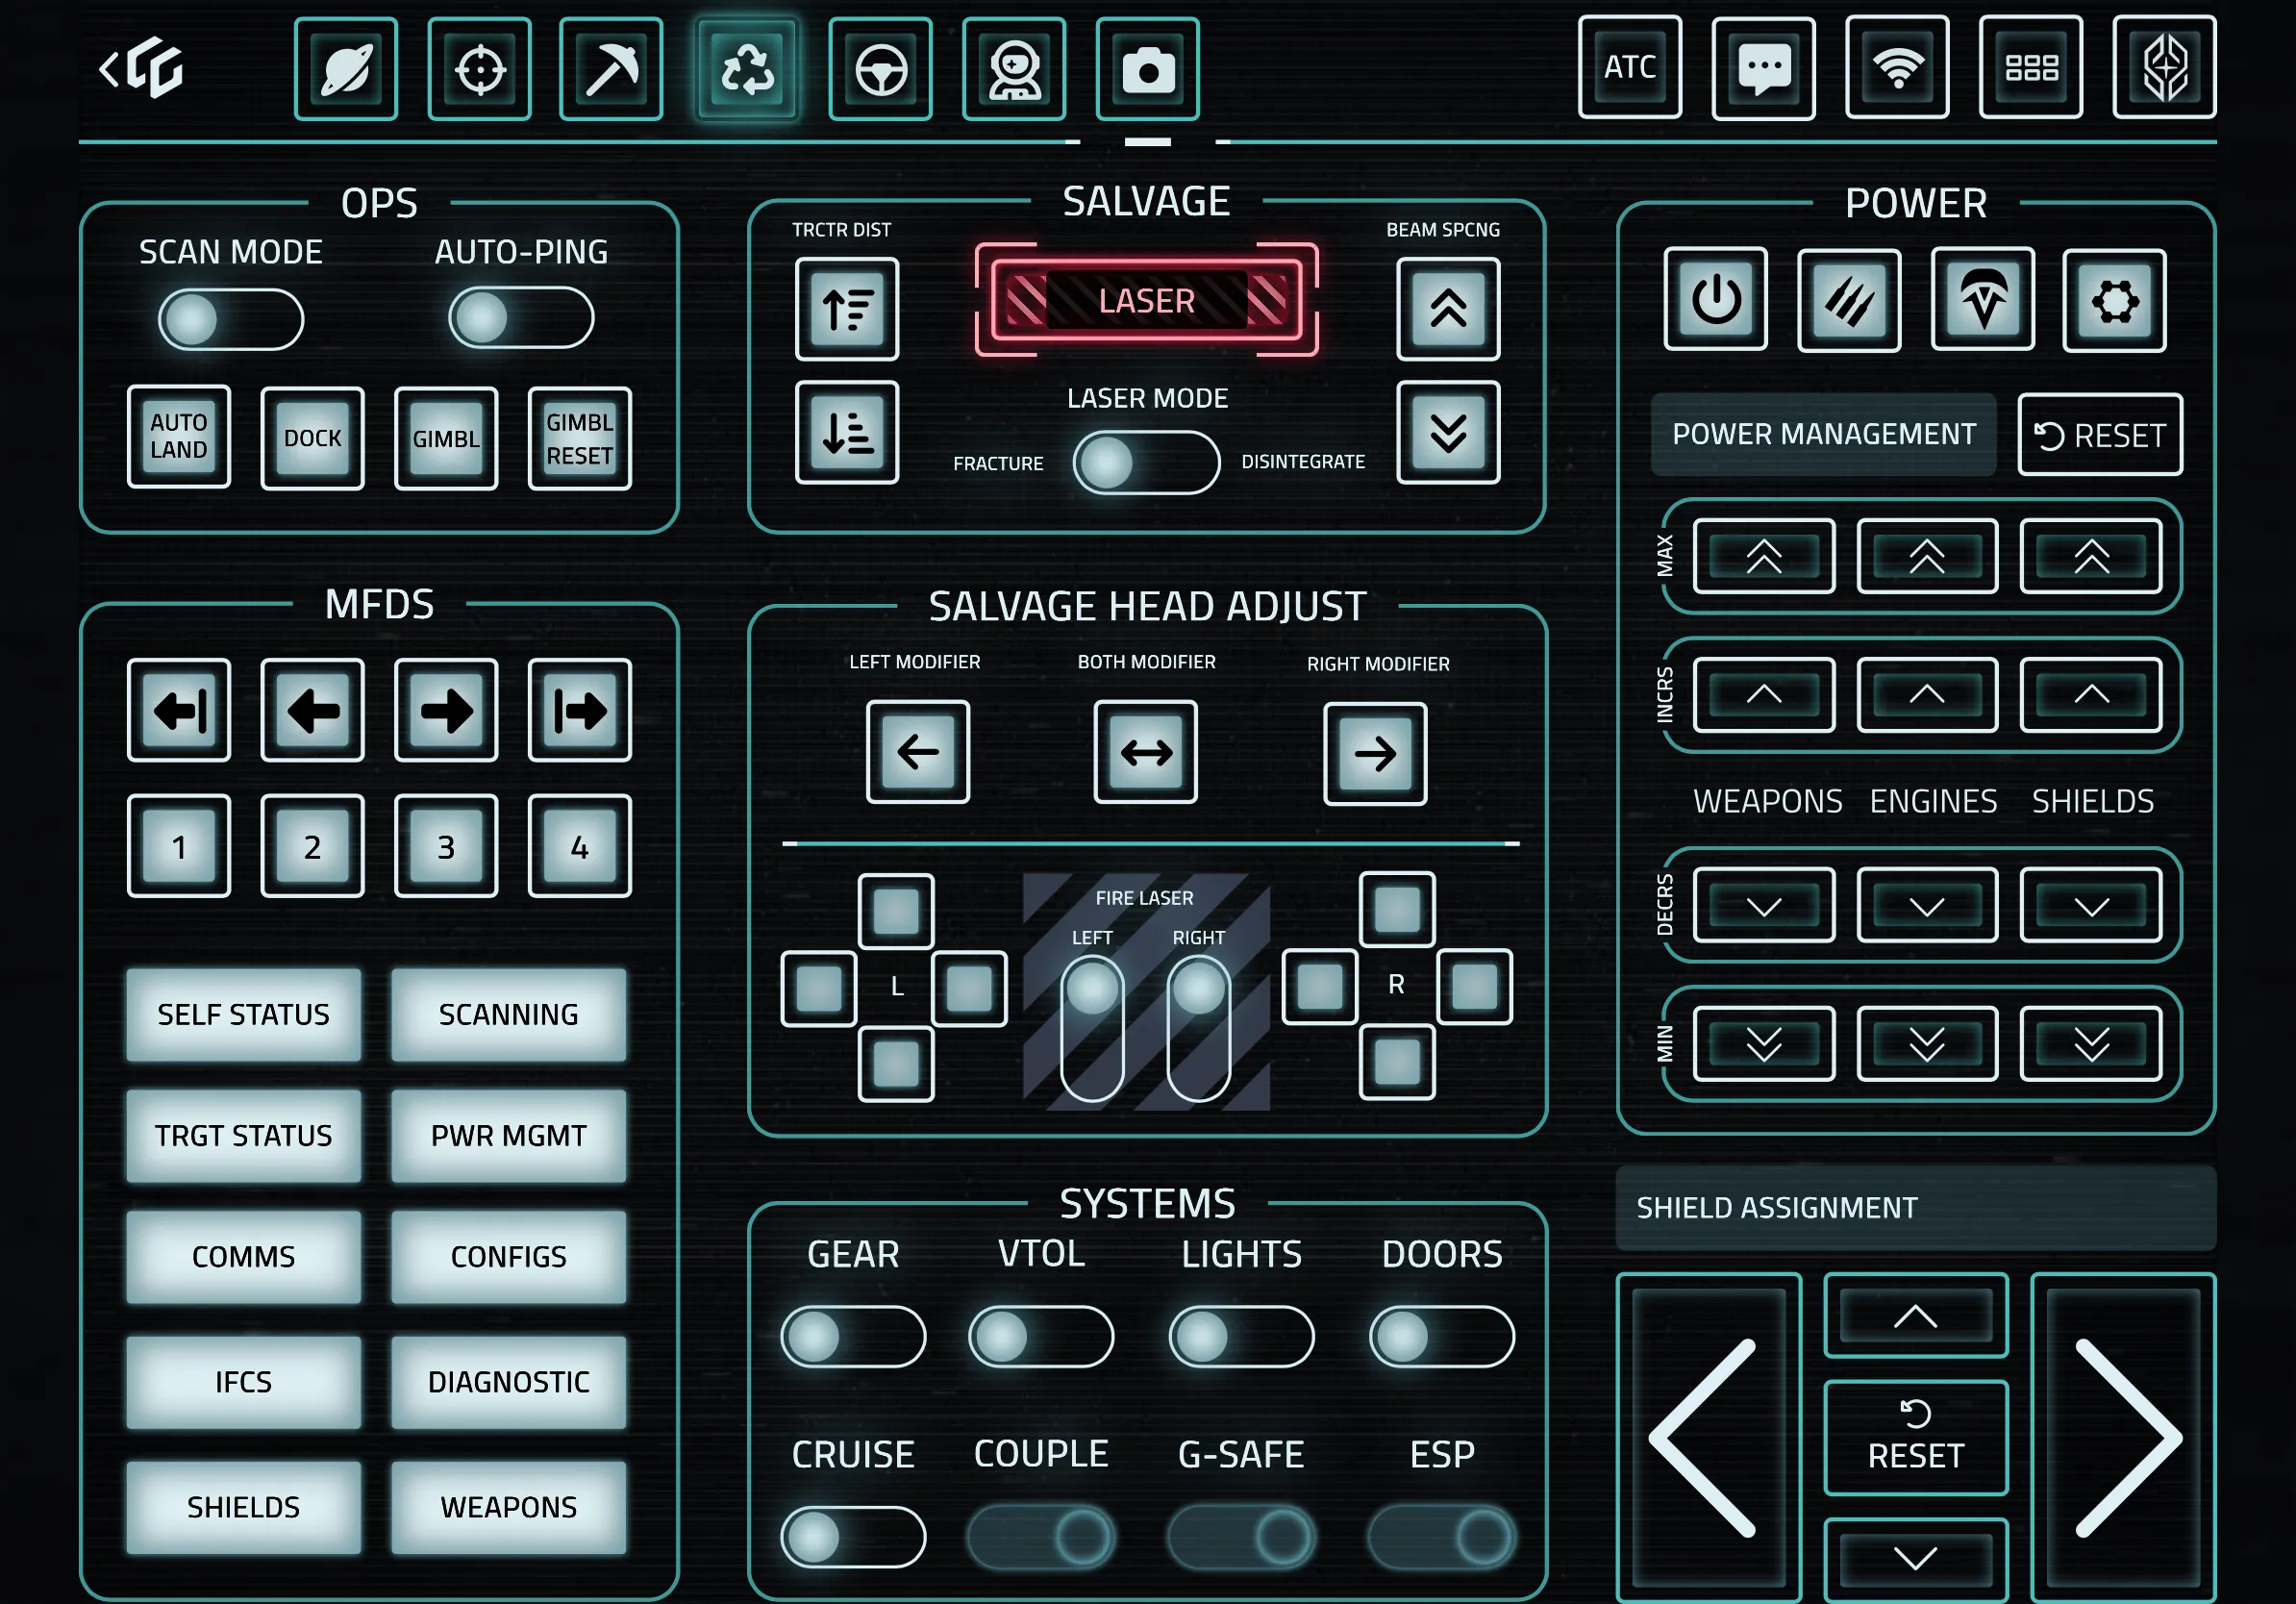
The Salvage shard is built for ships like the Vulture, Reclaimer, and other salvage vessels.
Salvage Controls (Center Top)
- Laser — Toggle the salvage beam on and off
- Trctir Dist — Adjust tractor beam distance
- Beam Spcing — Control beam spacing width
- Laser Mode — Switch between Fracture and Disintegrate modes
Salvage Head Adjust (Center)
For multi-head salvage ships, you get precise control over each salvage head:
- Left Modifier — Adjust left salvage head only
- Both Modifier — Adjust both heads simultaneously
- Right Modifier — Adjust right salvage head only
- Directional Controls — Move salvage heads up, down, left, and right
- Fire Laser — Central fire toggle for the active head(s)
- L / R indicators — Show which head is currently selected
Ground Shard
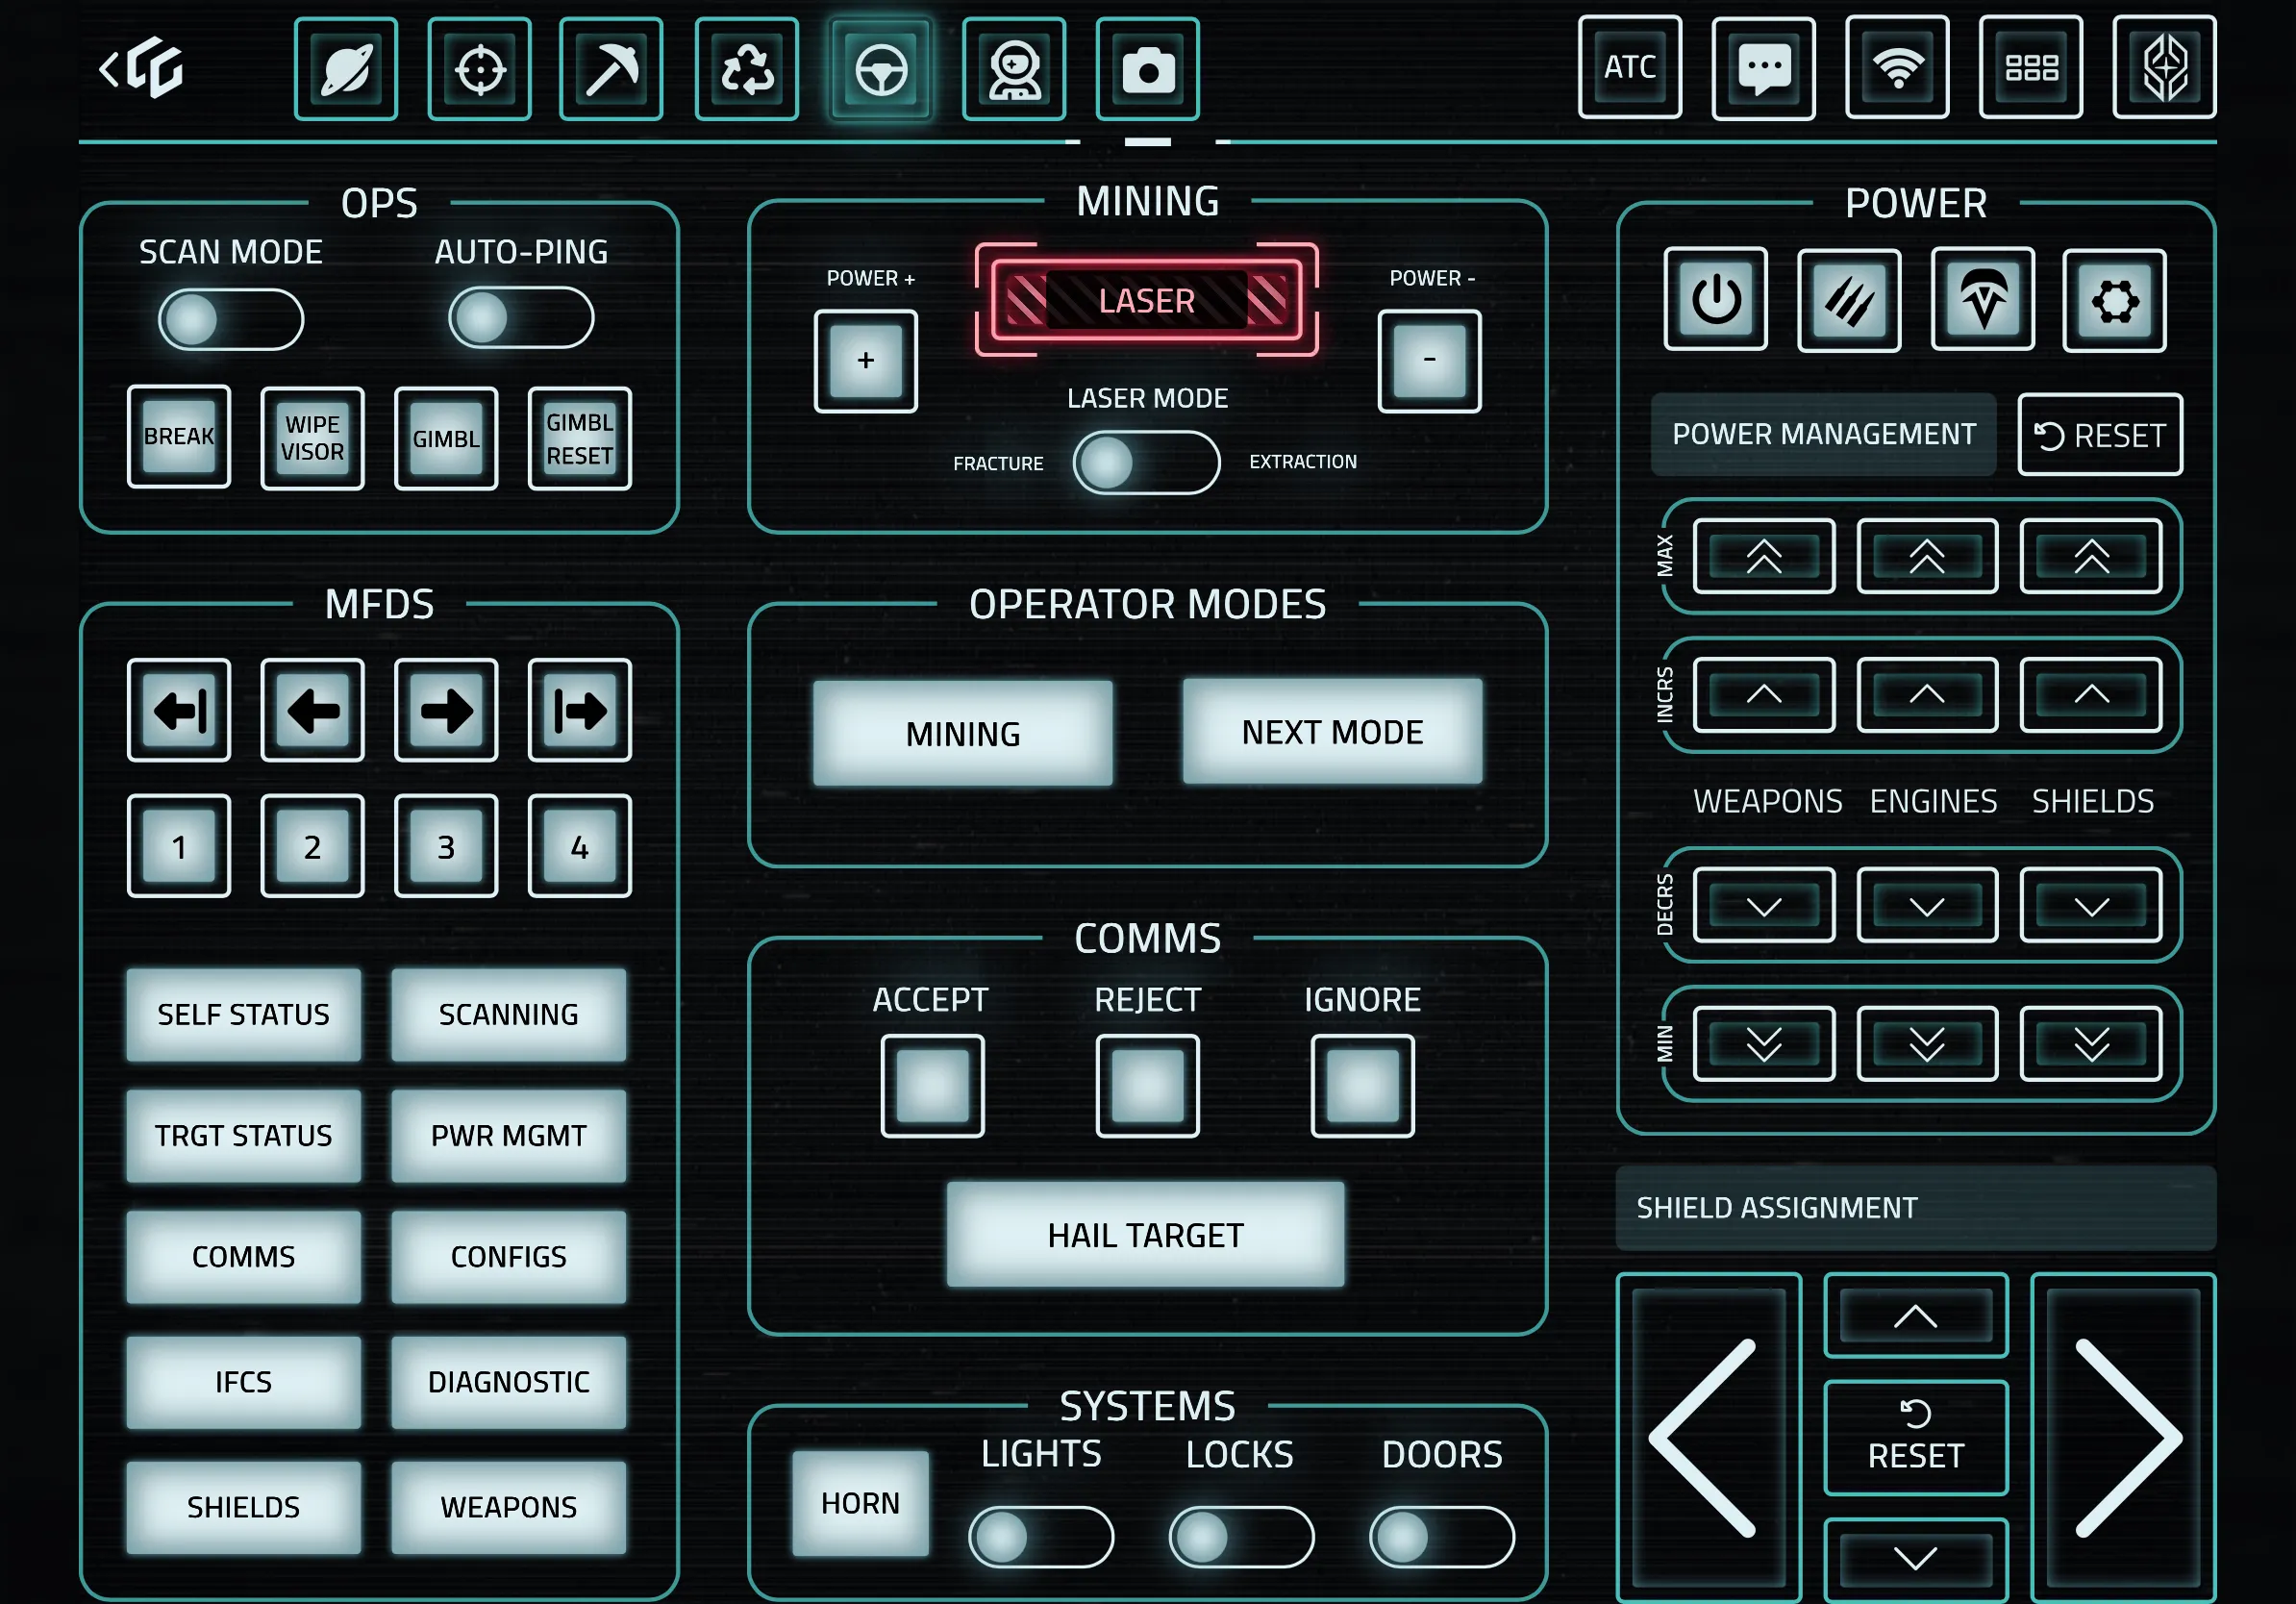
The Ground shard is designed for ground vehicles and on-foot operations with hand mining support.
OPS Section
- Break — Vehicle brake
- Wipe Visor — Clean helmet visor
- Gimbl Reset — Reset gimbal position
Mining (Hand Mining)
The same mining laser controls are available here for hand-held mining tools — Laser toggle, Power adjustment, and Fracture/Extraction modes.
Operator Modes
- Mining — Enter mining operator mode
- Next Mode — Cycle to the next available operator mode
Comms
- Accept / Reject / Ignore — Handle incoming communications
- Hail Target — Send a hail to your current target
Ground Systems
- Lights — Vehicle lights
- Locks — Lock/unlock vehicle
- Doors — Open/close vehicle doors
- Horn — Sound the horn
Emotes Shard
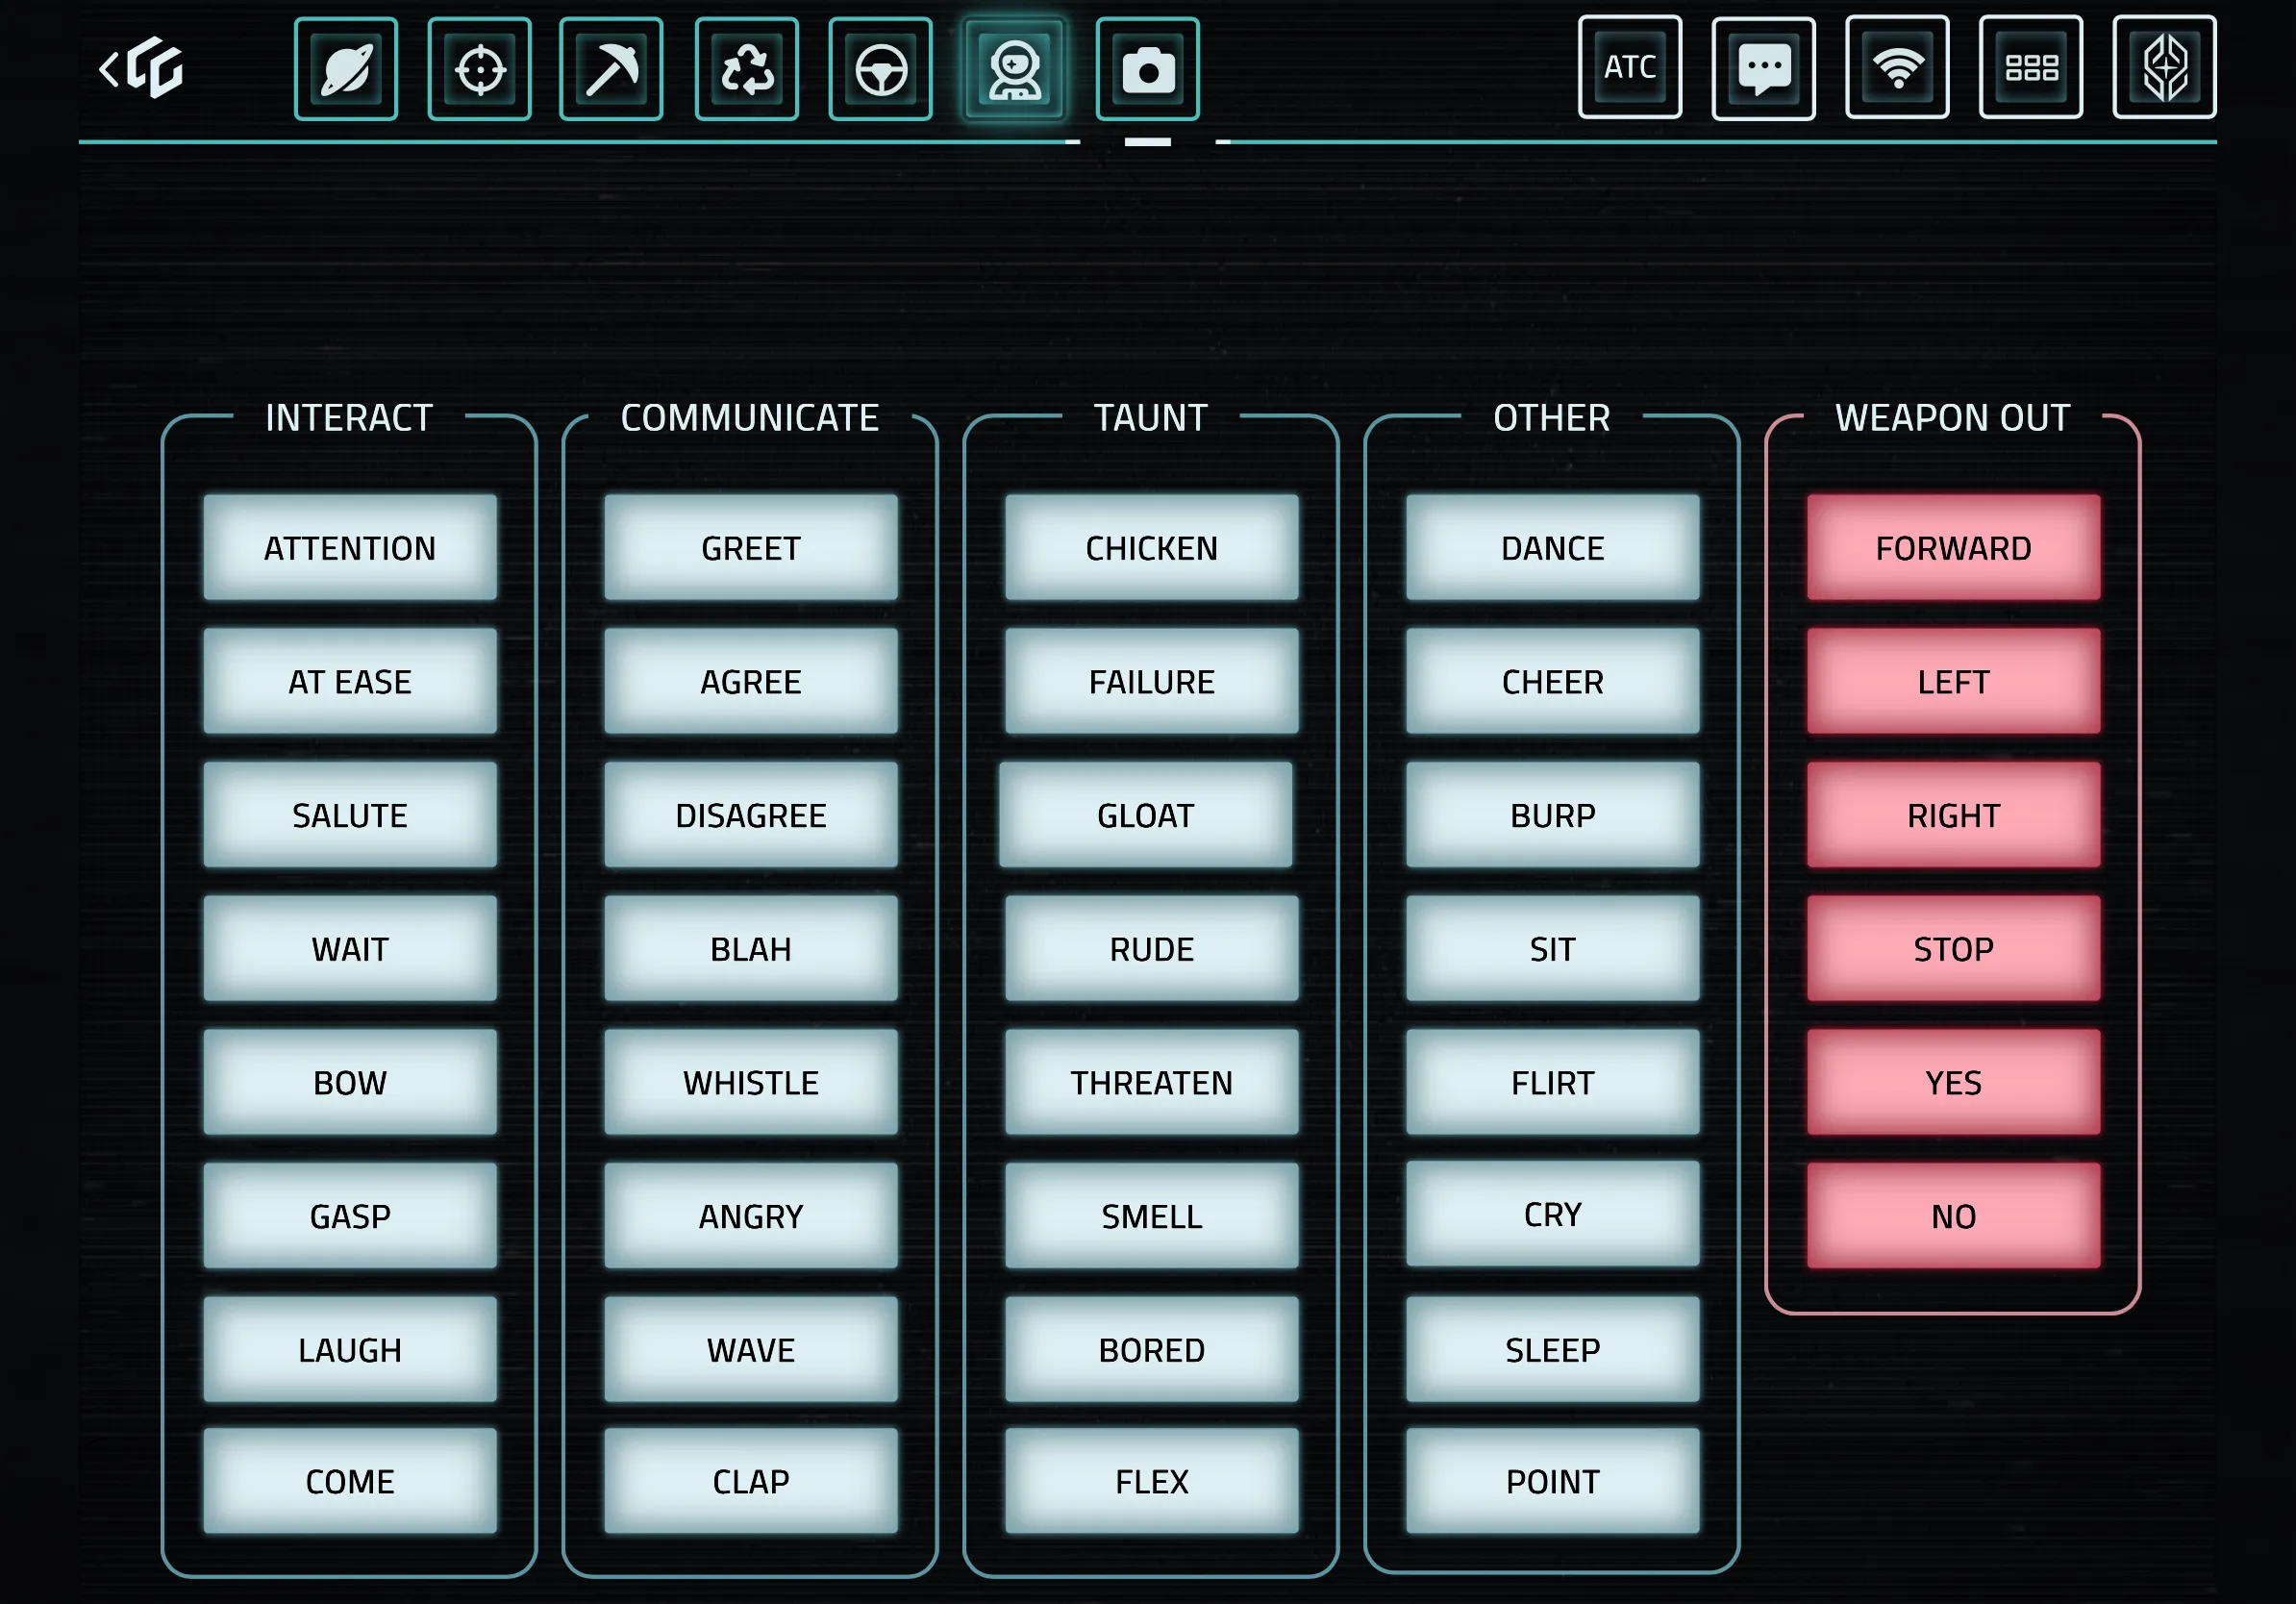
The Emotes shard gives you one-tap access to every emote in Star Citizen, organized by category.
Interact
Attention, At Ease, Salute, Wait, Bow, Gasp, Laugh, Come
Communicate
Greet, Agree, Disagree, Blah, Whistle, Angry, Wave, Clap
Taunt
Chicken, Failure, Gloat, Rude, Threaten, Smell, Bored, Flex
Other
Dance, Cheer, Burp, Sit, Flirt, Cry, Sleep, Point
Weapon Out
These emotes are specifically for when your weapon is drawn: Forward, Left, Right, Stop, Yes, No
Quick Reference: All Shard Codes
| ██████ | ███████ | ████████████████████████ |
| ██████ | ███████ | ████████████████████████ |
| ██████ | ███████ | ████████████████████████ |
| ██████ | ███████ | ████████████████████████ |
CDYN Keybinding Layout
Our shards are mapped to the CDYN custom keybinding layout for Star Citizen. Download and import it so every button works correctly:
Download CDYN Keybinding Layout (XML)
To import: copy the file to your StarCitizen\LIVE\USER\Client\0\Controls\Mappings folder, then select it in-game under Options > Keybindings > Control Profiles.
Tips for Using CDYN Shards
- Keep Main as your default and swipe to specialized shards when needed
- Power management is available on most shards so you never have to switch back just to adjust power
- Shield assignment is on every flight shard — get in the habit of adjusting shields in combat
- The Master Modes section is consistent across Main, Mining, and Salvage so muscle memory transfers between roles
- Customize further if you want — use our shards as a starting point and adjust buttons to match your personal keybinds
Questions? Hit us up in Discord.
Discussion